Wednesday, February 20, 2013

Soviet Assault on Erfurt

A Headless Body production.

Location: Showcase Comics, Granite Run Mall, Pennsylvania
Tournament: Whiteout!
Game: Flames of War Late War 1780 points
Mission: Fighting Withdrawal
Players: Phil Gardocki, Legkiy Samokhodno-Artillyeriyskiy Polk (attacker)
                 Miles, Panzerspah (defender)

First, an apology:
Apology redacted as inaccurate and unnecessary.

The Forces:
2nd Tank Army's 1st Battalion, 1441st SU Regiment, 1/307th Tank Company, 208th Flak Company, 5/1441 Reconnaissance Company (Confident, Trained), 89th Guards Mortar Battalion (Fearless Trained).


A total of 15 SU-122's in 4 Batteries, 10 T-34's (5 76's, 5 85's), 8 Katyushas, 2 DShk AA trucks in 1 battery, 3 ZSU 17's, and 5 Recon Rifle/MG teams.

German (Confident, Veteran) CiC, 2iC each with panzerfaust, SMG in a half-track.
One Full Aufklärungs Platoon with panzerfaust and full half-tracks.  One Reduced Aufklärungs Platoon with panzerfuast and full half-tracks.  Two Platoons of 3 Pumas, one Platoon of 3 pak38's,
one Platoon of 4 StuH42s, one battery of 4 15cm sFH18 howitzers.  The company had limited Air Support from a squadron of Hs 129B's.

Mission: Fighting Withdrawal. Prepared Positions.  Each side Attacker places two objectives.  The defender, one.  Attacker wins if he controls any objective by turn 6.

The Board:
4 by 6 feet. 
Early 1945, the Town of Erfurt, Germany.  Snow is still on the ground, and muddy conditions exist.  All hills and fords are bog checks, all streams are skill checks.


A rail station near the town of Erfurt.  Germans will be deploying on the left, Soviets on the right.

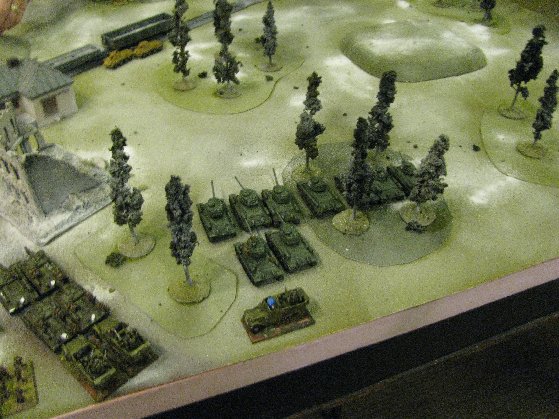
A closer view of the Soviet right side of the board.

Deployment:
The Soviet left side of the board after deployment.  I am going to try to rush the nearby objective, while screening the German forces on the center and right.

Visible in the distance are a German Puma Patrol, an Infantry Platoon, a Kampfgruppe of one Puma and the 2IC, and the objective.  The visible Soviet forces are 3 Batteries of SU's, an Infantry Recon Company, and the Katyushas.
The Soviet right consists of another Battery of SU's, and the 1/307th Tank Battalion.

German deployment on the Soviet right.  Two Platoons of Infantry, 2 Pumas, 4 155's and 2 objectives.
"Muddy Hell!", thought Kapitan Petrov, "Yes, the ground looks like it was iced over, but that ice was only a centimeter thick, and his tanks broke right through it. A frontal assault was pointless in this situation. This operation was insane."

But Kommisar Ivan Inanovitch Ivanovsky had assured him the enemy was pulling out, to redeploy elsewhere, and so there wouldn't be much of a fight.  But Petrov wasn't so sure, the Bosch constantly did unexpected things.

Turn 1:
My strategy was simple. On the right I would keep his forces focused on the 1/307 Tank Company, and on the left I would assault the objective.  The only problem was the terrain.  The rail line was all the way across the board, and the terrain severely limited any shooting lanes.

I pushed my recon as far as it could go.  Trying to reach the far woods in my 8" no ambush zone, but Miles would have none of it, and popped the ambush of 4 4 Stu42's on his turn.  I had a piece of luck, getting 3 shots on a Puma Platoon, and even with "Hens and Chicks", managed to burned one. 

The Germans had 2 Puma's on my side of the tracks, but when they saw they were facing 9 T-34s's retreated behind a hill.  His two remaining Pumas on the left flank rolled well and killed 2 of my SU's.  The 155's battery ranged in on the 1/307 Tank Company, but to no effect, while his Flying Tanks tried to take advantage of my condensed formation.  I have taken this into account with my Regiment design and brought the 208th Flak Company with me, while the 89th Guards Mortar Battalion also has another 2 dedicated AA teams. 20 dice later and is 2 HS-129's went down in flames.

Nothing to look at here.
3 SU Batteries advance, with the scouts in front.
In the town, another SU Battery advances.  On the hill, a nervous spotter squats, and off in the distance, a single Puma sets it sites.

Air action South!
Turn 2:
Losing the ability to negate the ambush, my recon headed for the near by buildings, waiting for an opportunity to do "Eyes and Ears".  My spotter also perched on a high top, waiting to bring down the hurt from the Katyusha's

His 155's found their range and managed to pin a T-34, while another airstrike avoided the Flak Batteries and killed a tank.  While his 2 lost Puma's tried to run around to board edge to get flank shots on the 89th Guards Mortar Battalion.

Now the hard decision.  Move forward and suffer "Hens and Chicks" and hit him on a 6 only, or stay at long range and double fire.

Air action North!  No AA here.

2 Pumas trying to sneak around the flank.
Turn 3:

Now I was getting distracted.  There was that 155 spotter on the hill, and all I needed to do was assault it.  Unfortunately, I didn't have the movement to reach him.  I did have the the 4/1441st Battery kill the Puma that was part of the Kampfgruuppe.  But that was pointless, as he was set to remove that platoon anyway as part of the conditions for "Fighting Withdrawal".

The Katyusha's rain down upon the Germans.  This was a case where the wrong part of the devastation template did matter.  Sorry Miles.  I was targeting the Stu42's and including the 7 stands of infantry in the barrage.  Eventually I would crack the Infantry using this tactic. 


4/1441st kills another Puma.

But lose a battery in return.

Turn 4:
To avoid the 155 Barrage,  I started stretching out the 1/307 Tanks Company.  9 tanks at 6 inch intervals stretches a long way.  Two tanks covered the flanks should the 2 Pumas return, all the way to where I can get a shot on the Spotter, eventually killing him on turn 5.  Almost the entire Company within two inches of a building or wood, so that the next air strike failed to range in.

But my SU Batteries were spent.  One battery fled, another was down to one gun.  An air strike braved the AA and picked up the third.

The HS-129's pick up a battery.  In the background there is a lot less infantry covering the objective.
Turns 5 and 6:
     The situation is really not tenable anymore.  I managed to kill the spotter, but his CIC was able to fill the void, and call in more artillery on my remaining battery of SU's.  I may be able to contest the objective, but he will pick it up next turn and then I will not be able to switch to another one.

His Stu42's were totally intact. and with that his AT ability was almost untouched.  So even though I manage to wipe out his infantry platoon, and on turn 6 his CIC, there was no chance at a win.


Still running down the Spotter, off to the right, and managed to MG him down as he fled.  But the guns were ranged in right on the center of town.

Final.  The wreck of the 1441st "STAVKA", "Red Banner", SU regiment.  a 2-5 loss.

Monday, February 11, 2013

Attacking the Wiking SS at Vyazma

A Headless Body production.

Location: Ed Bernhard's Basement 
Players: Phil Gardocki, Legkiy Samokhodno-Artillyeriyskiy Polk (defender)
                 Ed Bernhard, Wiking SS (attacker)
Game: Flames of War Late War 1780 points
Mission: Encounter

The Forces:

2nd Tank Army's 1st Battalion, 1441st SU Regiment, 1/307th Tank Company, 208th Flak Company, 5/1441 Reconnaissance Company (Confident, Trained), 89th Guards Mortar Battalion (Fearless Trained).

A total of 15 SU-122's in 4 Batteries, 10 T-34's (5 76's, 5 85's), 8 Katyushas, 2 DShk AA trucks in 1 battery, 3 ZSU 17's, and 5 Recon Rifle/MG teams.

SS Wiking (Fearless, Trained) 2 Platoons of Grenadiers, 1 Platoon of 3 PaK 43’s (which was broken up and parsed to the Grenadiers), 1 Platoon of 3 Panzer IV’s (containing a Kanon), 1 Platoon of 2 STG's (also containing a Kanon), 1 Kampfgruppe of 2 STG's, 1 Reconnaissance platoon of 3 armored cars, and limited air support.


The Mission: Encounter, The Germans rolled to be the attacker.  Though, if you look at the mission, it doesn't matter who is attacking and who is defending.  2 objectives are placed in both the defenders and attackers area.   Each side has half their force in scattered, delayed, reserves.  Winner is he who can control either objective on the opposite side of the board.

The Board:
4 by 6 feet. 
A minor crossroad along the stream near Vyazma.

The Board:
A countryside area of fields, roadside hedges, woods and rises.


 The 1441st SU Regiment will be setting up on the left, "East", edge, the Wiking SS on the right, "West" edge.


Reverse view above.  1441st SU Regiment right, Wiking SS left.

Deployment:
     Both Ed and I are practicing for an the upcoming tourney, "White Out" and we know they love their bocage.  So the hedges along the road were considered bocage, even though this is very un-Russia like terrain.  This had the effect of splitting the board in two.  We each had an objective on each side of the split.  I decided to make a play for the right most objective and placed Boris Badinuff's 1/307th Tank Company, backed by Kapitan Poritonski's Guards Mortar Battalion.  This left my AA and Recon Companies to defend the other objective.  The Wiking SS had one Grenadier Platoon defending each objective, their Panzer IV Platoon, in between. 


Soviet Deployment, weighted right.  T-34's in front, 89th Guards Mortar Battalion behind.

German Deployment.  Pretty much center line.  One Platoon of Grenadiers on each objective, and a response team of 3 Panzer IV's.  The Kanon had been decorated with the Knight's Cross with Oak Leaves, allowing "Full Rate of Fire when moving" to go along with his "Re-roll Failed Skill Checks."

Soviet Deployment left.  3 ZSU-17's with quad .50 cals, and the 5/1441 Reconnaissance Company.

German deployment left.  A Grenadier Platoon backed by a PaK 43.
"Men", commanded Kapitan Petrov, "We have an opportunity."

"As we continue to encircle the Bosch in Vyazma, we have split off some of his forces, and can defeat them in detail."

"While most of the enemy are defending the ground further afield, we can take a key objective nearby, forcing them to come at us piecemeal, where our guns can grind them into dust."

"I know our SU's have not yet arrived from resupply, but Kommisar Ivan Inanovitch Ivanovsky, has gone to expedite their return.  Badinuff's tank company will pin the enemy till they arrive, and with speed and daring, we will secure a victory for Mother Russia!" 
   
I don't intend to fight on the left side of the board, and I didn't think the grenadiers on that side were going anywhere either, so I pushed the 5/1441st recon company to the hedge line, just to posture.  The 1/307th Tank Company began their hub to hub charge, but were slowed by the wheat field.  I am relying on the road side hedges to keep the Panzer IV's off my flank.  And with this mission, there are no ambushes.  The Wiking SS adjusted their Panzer IV positioning to compensate, but the other forces just waited.  (note to Ed, you probably should have dug in.)  The Luftwaffe made an appearance.  Two planes arrived, one was shot down, the other bailed a T-34.

Retiring the 208th Flak company, closer to the Kat's.

First air strike right on cue.  One plane was shot down, the other caused a bail.

 Turn 2:
I know I am relying on a massive tank company to carry the day, and it can take a hit, then punish my opponent afterwards.  But after measuring the distances, I couldn't get to 16 inches with all my tanks on turn 2.  If I am going to give his 2 PaK's the first shot, at least I want my return shot to be worth while.  So I decided to get ready for turn 3 by taking cover behind the hills and woods.
The 1/307th take cover from the PaK's.

But I forgot about the gap in the hedge.  The German platoon leader has another notch for his barrel. 

Turn 3:

Turn 3:
No Soviet Reserves arrive. Kapitan Badinuff's tank company take up firing positions on the hill near the Grenadiers and their PaK's.  But as I am outside of 6 inches, there are no targets visible.

German reserves arrive.  A pair of STG's, one of which is commanded by a warrior decorated with the Knight's Cross with Oak Leaves.  He arrived on the left side of the map, suddenly making one of my objectives vulnerable.  The Luftwaffe also made an appearance, and blew up a Katyusha.
Safe from the gap in the hedge, which is off camera to the left, but not in a good position to shoot either.
The Luftwaffe bags one Katyusha.

The Grenadiers,emboldened by the arrival of a pair of STG's, join them in an attack on my objective.
"Hurry up, he says!  You don't need a full load, 20 rounds of is enough, he saysHead to the sounds of gunfire he says!  What gunfire?  I have heard more noise coming from a fly fart" complained Leytenant Koning, platoon leader of the 1/1441st SU battery.


Turn 4:
Soviet reserves arrive.  A battery of SU's on the right corner of the table. The tactical problem is this:  The enemy is invisible to me unless I get to within 6 inches.  If I approach to 6 inches, "Hens and Chicks" means I have a ROF of 1 with a +1 to hit.  Also, the Grenadiers can surprise my tanks by assaulting from the woods.  Then my surviving tanks finally get to shoot back.  This is a bad plan. Lets see if I can fish him out by approaching with one T-34 to 6 inches.  

German reserves arrive.  Another pair of STG's, following the first.  The race is now on on who can secure an enemy objective first!  I have nothing that can deal with the STG's on the left, and I realize that the hedges would keep me from reinforcing that area.  Worse, only fully tracked vehicles can cross the hedge so my AA Company is trapped.

Not all of the 5/1441st Recon Company manage to get back to the safety of the woods but the STG's MG's shoot wide and miss.  The PaK's step out of the woods and blow up the fishing T-34.  Then "storm-trooper" back into the woods.*  What??? Consult the rule book.  It doesn't matter if the PaK's shot in turn 4, they are still not visible on turn 5.

Sending in a scout.

This is why you might not want to be seen.

The First Platoon of STG's navigates the gap in the hedge and approaches the now retreating 5/1441 Reconnaissance company.  The STG platoon leader is a war hero, decorated with the Knight's Cross with Diamonds.("Full Rate of Fire when moving",  "Re-roll Failed Skill Checks", "Re-roll failed to hit rolls" and "Warrior is only destroyed on a 5+".)
The Panzer IV's take up position on the hedge line, but this is a standoff as no-one can see anyone right now.

Turn 5.
Turn 5:
Soviet reserves arrive. Two more batteries of SU's.  Both on the right hand corner.  Since that corner is at a standoff right now, I'll wait till they get into position and then charge the objective.  While my objective is being assaulted by the STG's, I think it will still take 3 or more turns for him to secure it.

German reserves arrive.  An armored car platoon reinforced with some foot troops armed with Panzerschreks.  They also arrive on the Soviet right flank.  The schreks do their thing, and kill two more T-34's.  This is a mixed blessing.  They may hurt my tanks, but offer me a cheap platoon to kill.

German armored cars and Panzerschreks arrive on the right flank of the 1/307th.

And to add to the hurt, the PaK's are rolled out of the woods.

The STG Warrior lines up a shot on the AA guns and kills one.  One of the recon teams is also Machine-Guned down.


New dice for legibility.
Turn 6:
Soviet reserves arrive. The last battery of SU's arrives on the left side.  I'll get three flank shots on the one platoon of STG's, while lining up an assault with my recon teams.  3 shots, 2 hits, 1 bail, 1 killed.  But I measured poorly setting up the assault as the bailed survivor was 6 and a smidgen inches away and out of reach.

On the right flank, the SU's get their first shots on the Armored Car Platoon.  The cars themselves make their skill check and vacate the area, leaving two guilty faced infantry teams holding smoking tubes of spent panzerschreks to face down 3 batteries of SU's.

The 5/1441 Reconnaissance Company prepares to assault the STG's.

The 4/1441, "Grey" battery arrives.  Flaming the STG Kanon, and bailing the other STG.  The men of the 5/1441 Reconnaissance Company breath a sigh of relief as this is a case of "shot too well" and the bailed STG is out of range.


"Hens and Chicks" be damned.  When you have this many 12.2cm guns shooting at you, its over.


The Kanon fled his STG to take control of his other vehicle.  Only to find the crew had already fled the field.  The other two STG's take up defensive positions along the hedgerow.


Turn 7:
The 89th Guards Mortar Battalion gets a lucky turn and manages to bail the other two STGs on the road and pin the supporting Grenadiers.  The 5/1441 Reconnaissance Company get their opportunity to assault the bailed platoon, destroying both STG's, then pull back.

On the right flank, the SU's line up on the Grenadiers in the woods, killing one PaK, and an infantry team.  The T-34's knock off an armored car.  The Armored Car Platoon passed it's motivation testBut we called it here as Soviet win.  The left side was a draw, no Soviet Platoons have failed, while the Germans only had one Platoon not sitting at 50%.

The 5/1441 Reconnaissance Company approaches, assaults and recovers leaving 2 smoking STG's.


Final position on the right flank.  The Soviets were set to alternately step forward their batteries giving one "volley fire" while the other suffers from "Hens and Chicks".  The single PaK-43 couldn't stop them from coming in and taking the objective.


Wait a minute.  Where is the platoon of 3 Panzer IV's?  Why haven't they stepped in here somewhere.
Unfortunately, fate stepped in there.  One Pz IV was firing into the flanks of the T-34's when available, but mostly he didn't have a shot, or it missed.  The other two got bogged crossing the hedge, and even with "re-roll skill checks" there was a never ending series of 1's and 2's.  There was no need to belabor the point in the batrep.  On turn 7 I detached one of my SU Batteries to face them down should they succeed in unbogging, and attacking them if they stayed bogged.  At that point, whether the Pz IV's would have won or lost, they could only have changed the score from a 6-1 to a 5-2.

*It has been pointed out to me that Gun Teams cannot "Stormtrooper" after shooting.  You learn someting new every day.


Monday, February 4, 2013

1944, Encounter With the Wiking SS

A Headless Body production.

Location: Ed Bernhard's Basement 
Players: Phil Gardocki, Legkiy Samokhodno-Artillyeriyskiy Polk (attacker)
                 Ed Bernhard, Wiking SS (defender)
Game: Flames of War Late War 1780 points
Mission: Pincer

The Forces:

1st Battalion, 1441st “STAVKA”, SU Regiment (Confident, Trained) 15 SU-122’s in 4 batteries, 9 T34’s (76’s and 85’s), 8 Katyushas, 5 AA Teams in trucks and halftracks. 1 Reconnaissance company of 5 teams.


SS Wiking (Fearless, Trained) 2 Platoons of Foot, 1 Platoon of 3 PaK 43’s, 1 Platoon of 3 Panzer IV’s, 1 Platoon of 2 StuHs, 1 Kampfgruppe of 2 Panzer IV’s, and 1 Reconnaissance platoon of 3 armored cars.


The Mission: Pincer, Germans defending.  Game is played on the narrow (4 foot) sides instead of the long (6 foot) sides.  2 objectives are placed in the defenders area.  Both sides start in prepared positions.  Defender has 4 platoons in delayed reserves, 1 platoon in ambush.  Attacker wins if he controls an objective.  Defender wins if there are no attackers on his half of the board after turn 6.

The Board:
4 by 6 feet. 
A minor village along the dirt road near Vyazma.

The Board:
A steppes region littered with rises and woods.  Bisected by an S shaped stream in the middle.  A walled built over area northern area of the map.  A muddy road runs from southeast to northwest.
From the board's "North" edge.  The 1441st deploys.  This was a different camera, and I didn't get the hang of it.  From left to light, A Battery of SU's, The Katyushas, another Battery of SU's, the T-34 Battalion.  Off the right edge, "East" is yet another Battery of SU's.


Same deployment shot from the "East" edge.


German Deployment on the "South" edge of the board.  One Gren Platoon in the wheat field "East", the other in the woods by the ford.


“Ah, a task worthy of our guns.” Thought Kapitan Petrov, “And a way to erase the humiliation of our last encounter with the Bosch.”

“The task looked easy, too easy.  He couldn’t see them, but he knew they were there.  Just over the stream.  They saw his force, and pulled out their mobile assets.  Their plan was to lure him in and then surround him.  But all he had to do was take and hold one point, and their plan would fall apart.”

“He would approach the ford with his reconnaissance company to spy out any large guns.  Then force the ford with 2 of his SU batteries.  One of his SU batteries had already crossed the stream in the east and was awaiting orders to move out.  Another would cover the western approaches against any pincer movements.  Two batteries up the middle to cross at the ford.  Badanoff’s T-34’s would force a crossing, risking their tracks, and be in a good position to shoot up any flankers”

Turn 1:
The recon company disembarked from their trucks and approached the stream.  The dug in Germans offered no shooting and no targets.  Badanoff’s T34 Company approached the stream for their crossing.

The Luftwaffe made a show and got 8 tanks under the template.  But two Dhk’s and one ZSU managed threw 14 dice of AA fire and shot them down.
Eight under the template!, but 14 50cals managed to shoot them down.  The Recon Company closes in on the ford, backed by an SU Battery.

Turn 2:
One battery of SU’s lined up within site of the SS Grenadiers dug in the woods.  Even with Hens and Chicks.  I can hit trained units on a 6 and do.  With breakthrough guns, there is no 3+ save for the infantry, and I only need a 2+ firepower to kill a dug in team.  And of course, I roll a 1.   Badanoff’s T34 76’s, with their wide tracks, forded the stream with only one bogging.  However, the 85’s all bogged in the attempt.  The Luftwaffe made another show and got 5 tanks under the template.  This time only the two Dshk’s were in range, but they still shot down one HS-129, causing the air strike to reroll hits.  The end result was one just one bailed T-34.


All Soviet units are ready to make the crossing.  The Germans remain quiet.


Turn 3:
One battery of SU’s now start to volley fire the woods line, while another crosses the stream.  The SS Grenadiers realize they can’t stay there long and back away from their positions.  The T-34’s still have their company commander bogged along with another 2 T-34/85’s.  A day later I found the rule that allows the commander to take command of an unbogged vehicle and keep moving.  The eastern most battery of SU’s advance and take a position on a knoll and start bombarding the SS in the wheat field.  German reserves fail to show up.
Soviet turn 3.  One battery makes the crossing while the other provides covering fire.  This has to be done right as the SU's do not have MG's, and can easily be assaulted.

While on the "East" side of the board, most of the Badinuff's 307th T-34 Battalion manage the crossing. 

Turn 4:
Soviet Reconnaissance cross the stream and head for the woods. All the SU batteries have crossed the stream.   The eastern battery of SU’s start volley fire on the Grenadiers in the wheat field.  The 6 T-34’s that crossed the stream added their shots to that as well.  If they clear the field then the game is ours. 
German ambush is revealed, 3 Pak-43’s along the woods edge.  Initial shot killed one SU, and bailed another.  German reserves fail to show up.   Grenadiers also form up in the distant woods near one of the objectives.

The south region of the board.  German PaK's are along the woods edge.  The Grenadiers at the top of the board are defending the objective by the wheat there are under pressure there, while the Grenadiers at the bottom of the picture are abandoning their dug in positions.


Turn 5:
With the ambush revealed, the Katyusha’s had a target to shoot at.  They ranged in, but caused no damage.  One SU battery approached the PaK’s as well, but failed to kill any of the guns.

German reserves showed up.  3 Panzer IV’s.  Arrived on the east edge of the board, and started hammering the SU batteries.  Between them and the PaK’s a whole battery of SU’s went up in flames, and most of another.
Top of Turn 5.  The Recon Company follows the retreating Grenadiers into the woods.  One SU is burning, and the others begin to line up on the PaK's.  My thought at this time is to occupy the Germans with this force, even if it means losing them all.  I intended to win with the 307 assaulting the Grenadiers in the wheat field, as soon as Kapitan Badinuff unbogs from the creek.


Bottom of turn 5.  Germans Panzer IV's arrive, just in time to replace the rapidly attriting Gren Platoon in the wheat field.  One of them is a "Kanon" which can move and shoot at a full rate of fire.


Turn 6:
Once again the SU’s and the Katusha’s traded shots with the PaK’s and the Panzer IV’s.  This time with long range shooting from the T-34’s as well.  Between them one PaK and one Panzer IV was killed.  The PaK crews abandoned their guns at that point.  But in the German turn, another SU Battery was destroyed.  The eastern most SU Battery finished picking up the Grenadiers in the wheat field.  This would force the Panzer IV’s to stay exposed, or surrender the objective.

Top of Turn 6.  One SU Battery is gone, but another is driving up to replace it.
Bottom of the 6.  The Grens assault the Recon Company.  The Grens were hit 3 times on the assault, and failed all 3 saves, but still killed two Recon teams, causing a Platoon Morale check, which the Recon failed and fled the board.

Turn 7:
German air arrives and lines up on 8 Katyusha's            
German reserves arrive from the north edge of the board.  2 Panzer IV’s move up and flank the ZSU’s.  Despite only an armor value of 0, the Panzers only bail on half track.  This leaves only 2 AA guns to fire at the HS-129’s, but throwing 12 dice was enough to shoot down the planes. 

Off to the "East", at the top of the picture, the last SU Battery has two guns killed, and the third gun fled.  With four SU Batteries and one Recon Company gone, the 1441st is at it's breaking point.  It failed it's motiviation check, so the SS Wiking held the ground to fight another day.


2 Panzer IV's arrive and first shoot at the ZSU's, but only bail one.  But it is only a matter of time as there is nothing that can stop them from shooting up the Katyushas.  At this point the Soviets failed motivation, but it was a close call, a 4-3 game.